Punch-to-die Clearance: What Works & What Doesn’t?
Punch-to-die clearance (Δ) is the space between the cutting edge of the punch and the cutting edge of the die button, which is determined by the thickness and the type of material being punched.
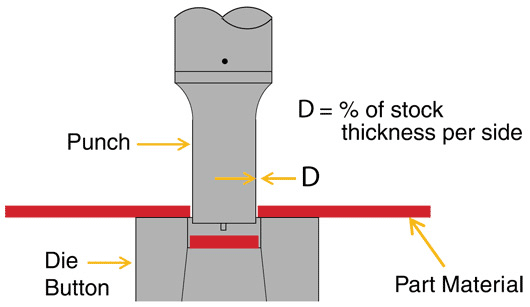
Optimizing the die clearance is one of the most important steps to punching success. Too large or too tight, an improper clearance can lead to poor edge quality, reduced tool life, and more.
Part Material
The material being punched has a polycrystalline structure with a pre-determined fracture plane. When the punch penetrates the material originating at the cutting edges of the punch and die button on both the upper and lower surfaces of the material, it produces fracture–and pushes it into the die button. When the die button has the correct clearance, these upper and lower fractures connect. This frees the slug and releases the punching force.
Considerations
A common mistake is to specify a too-tight clearance, assuming it will improve the edge quality. This is not the case. When the die clearance is too tight, the upper and lower fractures essentially miss each other. Secondary cracks and/or double breaks are created.
In addition, with tight clearances the material has a higher tendency to grab the punch, thereby increasing the stripping force on the punch. Excessive stripping forces will result in abrasive wear and diminished punch and die button life. In general, increasing the clearance percentage will result in better hole quality and smaller burrs. However, it can increase the tendency for rollover and slug pulling.
For instance, the figure below shows the effect of clearance on roll-over and shear zones. Roll-over is minimized with tighter clearance, but results in uneven burnish and breakage. The opposite is observed with Dayton’s Engineered Clearance.
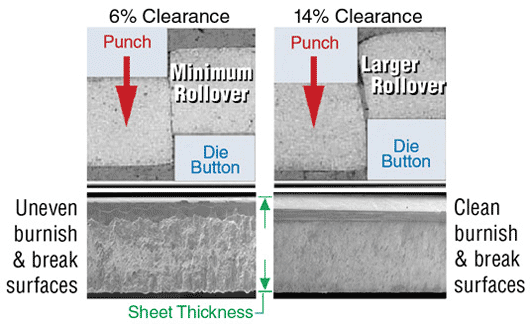
This change in hole quality is critical for holes where a secondary operation is performed.
Slug Inspection
Slugs are a mirror image of the hole, and can tell you if the clearance is appropriate for the application.
If the slug has a rough fracture plane, a small burnished land area, and excessive burr, the clearance is excessive.
Slugs with an irregular fracture plane, an uneven burnished land, and secondary shear indicate insufficient clearance.
Optimal die clearance produces a slug with a consistent burnished land that is approximately one third of the material thickness and an even fracture plane in line with the land.
Increasing Punch-to-die Clearance
Perforating a Hole
Punching (or perforating) a hole seems a relatively simple process. It is, however, a multiple step operation (shown below), and best product quality results can be obtained by optimizing the punch-to-die clearance.
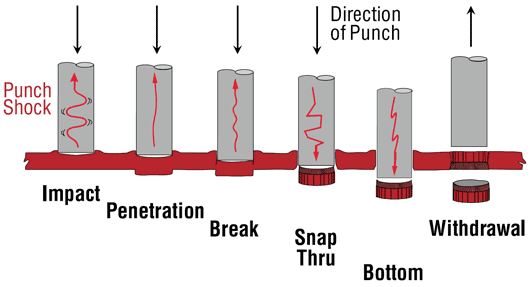
If the clearance between the punch and die button is too tight, the pressure can cause the slug to expand and jam in the die button. It will cause excessive wear, and can cause breakage and chipping of the punch–and result in slug pulling or jamming (stacking).
Industry Standard Clearance
A long-time industry “rule of thumb” used by die makers for the clearance between the punch and the die button is 5% of the stock thickness per side. This provided an acceptable burr height and slug control.
Extensive research and testing have shown that a significant increase in punch-to-die clearance can reduce burr height, increase the life of the punch, and improve hole quality–all good reasons to consider Dayton Engineered Clearance as the new industry standard.
The Dayton Engineered Clearance
The Dayton Engineered Clearance, considered by many as the “new” standard, offers a wider range of clearances, reaching as high as 28% Δ. ( Δ = clearance per side.)
The clearance itself depends on the stock thickness, the tensile strength, and the type of material–all driven by the requirements of the specific job.
A regular clearance of 5% per side can produce a hole 0.0001″ or smaller than the point of the punch. This creates a press-fit condition on the point during withdrawal, causing excessive wear on the punch and the die button. The Dayton Engineered Clearance produces a hole that is larger than the point of the punch, thus eliminating as much as two-thirds of the wear on the punch.
Optimization
Optimum benefits from The Dayton Engineered Clearance can be achieved by utilizing a Dayton product called a Jektole® Punch. The Dayton Jektole® Punch employs a built-in, spring-loaded ejector with a side vent hole, which helps reduce slug pulling by not allowing the slug to stick to the face of the punch. Thus, optimum punch performance and product quality are achieved.
 Dayton Jektole® Punches are used with all types of materials and applications (including high-speed, high-volume punching), and are a key part of the Dayton Engineered Clearance.
Dayton Jektole® Punches, utilizing the tested and proven Dayton Engineered Clearance standard, prevent slug pulling, breakage, and chipping, and help improve punch performance and product quality.
Improve Your Productivity: Select the Proper Clearance
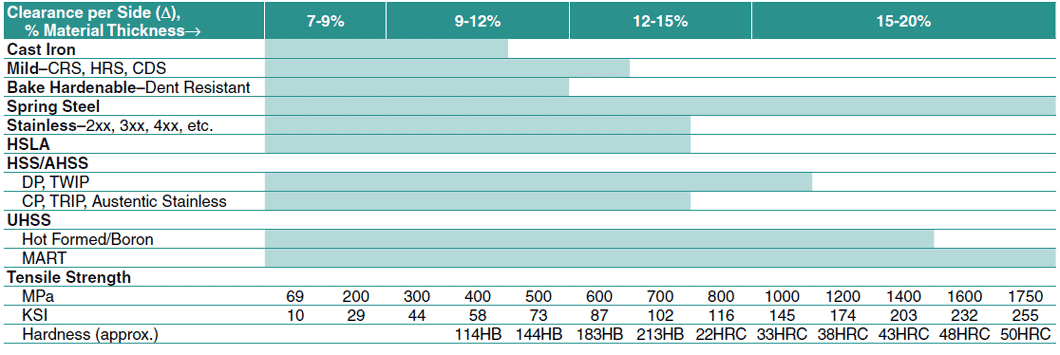
The two charts below show the Dayton Engineered Clearance for various steels and other materials. In the Ferrous Materials chart, both the tensile strength and the hardness ratings are shown. Tensile strength is presented as MPa, along with the appropriate KSI (Kilogram per Square Inch or PSI x 1000) conversion. Hardness values are shown in HB (Brinnel Rating Scale) or HRC (Rockwell Rating Scale), whichever applies.
The punch-to-die clearance depends on the thickness, type, and strength of the material. The Dayton Engineered Clearance offers a wider range of clearances, thus allowing you to optimize the performance of your materials.
How To Select The Proper Clearance
- Identify your grade of material on left side of chart.
- Identify the tensile strength of the material from the last row of the chart.
- If the material is HSS, AHSS, UHSS, or Aluminum, look up the thickness scaling factor based on the material thickness (see chart below)
- Multipy the recommended clearance from the chart with the scaling factor table.
- Examples:
- SAE Grade 280B (Bake Hardenable), Tensile strength 421 MPa. =10-11% Δ per side of Material Thickness
- SAE Grade 800 DL (Dual Phase), Tensile strength 860 MPa, Material Thickness=2.0mm (14% x 1.20 scaling factor). =16-17% Δ per side of Material Thickness.
Ferrous Materials–Engineered (Jektole®) Die Clearance, Tensile Strength, and Approximate Hardness Values
Other Materials–Engineered (Jektole®) Die Clearance and Tensile Strength
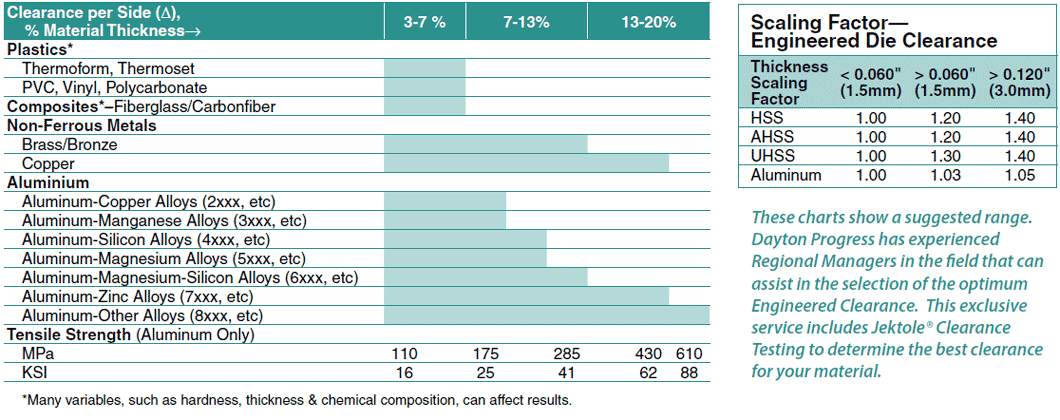
The ranges shown above are the result of more than 10,000 clearance tests performed by Dayton Lamina on actual customer provided materials. The optimum clearance will vary, depending on your requirements for burnish length, burr height, and tool life. See the next page to find out how to have your material tested by Dayton Lamina.
Jektole® Clearance Testing–Exclusively from Dayton
Clearance Testing
Dayton Lamina has performed extensive research, completing and validating more than 10,000 clearance tests. The Dayton Engineered Clearance does, in fact, offer many positive benefits:
- Reduces punch wear by reducing the force required to strip the punch
- Produces less burr/reduces the need for grinding
- Reduces downtime from re-grinding
- Reduces total punch and PM costs
- Requires less press tonnage
- Increases bottom line profit
Customer Clearance Testing
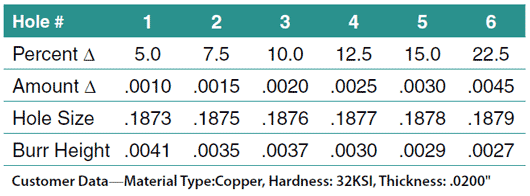
Customer clearance testing–an exclusive Dayton Lamina testing service–is available to any company interested in using the Dayton Engineered Clearance. In the test, a series of .188″ diameter holes are punched, using varying clearances to determine the optimum clearance for a given material. The chart shows typical test results.
The Process
- Provide Dayton Lamina with four samples of your material. Samples must be 25 mm (1″) x 100 mm (4″) up to 4.8 mm thickness; burrs removed; flat; and free of holes and material spurs. Note: Depending on the material tensile strength, the maximum thickness could be lower than 4.8 mm (.188″).
- Test results are analyzed and recorded on data sheets, showing clearance ranges and corresponding hole characteristics.
- After the samples and data sheets are returned, select the clearance based on hole size and burr height. If you desire a specific hole characteristics (e.g., more burnish length), select the clearance to meet your requirements by examining the test strip.
Clearance Test Sample
Jektole® vs. Regular Clearance
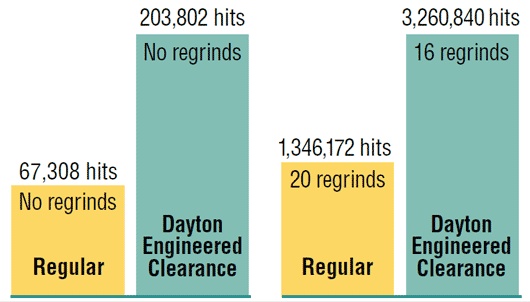
The bar graph above illustrates the dramatic differences in individual test results for both the standard 5% Δ clearance and the Dayton Engineered Clearance. Under similar test conditions, the standard 5% Δ clearance requires 41 hours of maintenance per million parts, while the Dayton Engineered Clearance requires 12.5 hours of maintenance per million parts!
Contact your nearest Dayton representative for Jektole® Clearance Testing.
