Reducing Downtime, Increasing Profit
Dayton Progress Understands the Issues Associated with Stamping Aluminum
- Aluminum Oxide buildup
- Perforating problems
- Accelerated die component wear
- Galling (adhesive wear)
Ultimately you have more downtime and increased maintenance costs; robbing your company of profit.
You can rely on solutions from Dayton Progress to increase profits.
The Dayton Progress Solution
We have developed punches specially designed for stamping aluminum. The combination of the right punch material, design, coating, and finish will improve your day-to-day operations.
Punch Design: Features that perforate cleanly and eject slugs efficiently.
Punch Material: Durable tool steel, heat treated in-house in our modern vacuum ovens.
Coatings: Dayton Progress uses long lasting coatings that reduce friction and increase wear life.
Finishes: Precision micro finishes that enhance the performance of our coatings.
Options That Fit Your Situation and Budget
| Production | Good | Better | Best | Callout |
|---|---|---|---|---|
| Punch Material | M2 | PS4 | PS | M2, PS4, PS |
| Chamfer | — | Yes | Yes | XS20 (round) or XS25 (shape) |
| Jektole | — | Yes | Yes | BJ_, DJ_, VJ_ |
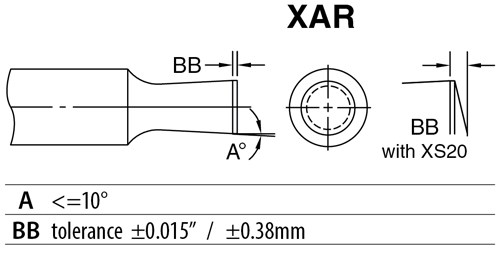
| Back Taper | — | — | Yes | XAR (round) |
| Diamond Coating | Yes | — | — | XCD |
| Polished Diamond Coating | — | Yes | Yes | XCDP |
Order Examples
| Good | VPX 37 1020 P.250 M2 XCD XS20 A7° | DPO 08 1371 P4.20 W3.5 M2 XCD XS25 A15° Y0.5 |
| Better | VJX 37 1020 P.250 PS4 XCDP XS20 A5° | DJX 08 1371 P4.20 M2 XCDP XS20 A5° |
| Best | VJX 37 1020 P.250 PS XCDP XS20 A5° XAR | DJX 08 1371 P4.20 PS XCDP XS20 A7° XAR |
Optimizing Punch Performance
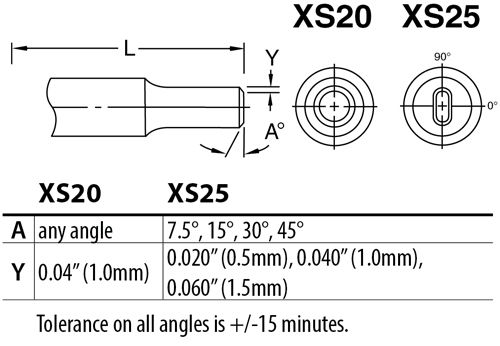
| Chamfer Shear AnglesXS20, XS25—Shear Angles are used primarily to reduce slug pulling. This feature has been proven effective to generate longer cycle life.Studies show that the XS20 (round) and XS25 (shape) shear angle can improve life cycles by 200-300%. |
 |
Jektole® Punch Many aluminum material applications use lubrication throughout the die and some materials contain a wax coating. This combination acts a bonding agent between the punch and slug. This magnifies surface tension and increases the possibility of slug bonding.The benefits of using a Jektole punch are twofold. The spring loaded Jektole pin (extending from the face of the punch) is a method to retain the slug in the die button after perforating. The Jektole punch also has a side vent hole which allows air to get in, breaking the vacuum and lubrication seal between the punch and slug. Many aluminum material applications use lubrication throughout the die and some materials contain a wax coating. This combination acts a bonding agent between the punch and slug. This magnifies surface tension and increases the possibility of slug bonding.The benefits of using a Jektole punch are twofold. The spring loaded Jektole pin (extending from the face of the punch) is a method to retain the slug in the die button after perforating. The Jektole punch also has a side vent hole which allows air to get in, breaking the vacuum and lubrication seal between the punch and slug. |
Back Taper XAR—Round punches can be ground with a back taper to reduce stripping pressure, heat, and material build up on point. This precise change in the size facilitates stripping material and is much less likely to adhere to the punch. Grind life is not affected. The reduction in diameter is so small that the punch remains within normal tolerances for both hole size and die clearance throughout its life. XAR—Round punches can be ground with a back taper to reduce stripping pressure, heat, and material build up on point. This precise change in the size facilitates stripping material and is much less likely to adhere to the punch. Grind life is not affected. The reduction in diameter is so small that the punch remains within normal tolerances for both hole size and die clearance throughout its life. |
 |
Diamond-like Carbon Coating XCD—This diamond-like carbon coating combines high hardness with an extremely low coefficient of friction. Offering good protection against abrasive and adhesive wear, it is ideal for aluminum. XCD—This diamond-like carbon coating combines high hardness with an extremely low coefficient of friction. Offering good protection against abrasive and adhesive wear, it is ideal for aluminum.(Approximate hardness: Vickers 5000)XCDP—This super-smooth, polished finish is combined with a DLC coating for a very low coefficient of friction with high wear resistance. It is excellent for stamping aluminum. (Approximate hardness: Vickers 2800) |
Galling Solutions for Aluminum
One of the most frequent problems encountered with perforating aluminum is punch galling. Aluminum, in general, possesses a gummy characteristic which causes it to adhere to a surface of the punch when it’s drawn, pulled, trimmed, perforated, or pierced. This accumulation of material on the punch is known as galling (adhesive wear). The galling occurs both on the initial penetration into the material and extraction from the material. The elastic nature of the aluminum collapses back into the hole as the punch is extracted, creating drag and pull on the punch. The tensile nature of the material must be considered in determining the correct die button. Dayton’s Engineered Clearance will aid in developing the proper clearance.
The galling of aluminum on the punch tip over time will cause the hole size to expand. This creates an out of tolerance hole quality issue on the part. Several remedies are available for this situation. These solutions may be incorporated separately or used in conjunction with one another to alleviate the galling and prolong punch life.
The initial solution considers how to offset the adhesive influence of the aluminum. To counteract the galling, we must reduce the co-efficient of friction between the punch and aluminum. This can be accomplished through several venues. One is to use a low co-efficient of friction coating on the punch. But coatings containing aluminum in their chemistry must be avoided. The trace aluminum will create an intense adhesive issue. OEM manufacturers have had great success with Dayton’s XCDP coating.
Perforating Considerations
The various grades of aluminum behave differently when perforating holes. A selection of M2 or PS4 or PS tool steel for the punch material generally achieves very good results. When punching the 5000 and 6000 aluminum series, the perforated hole size movement is minimal. By using the proper die clearance, the hole will be slightly larger than the punch.
However, when perforating the softer 3000 and 4000 aluminum grades, dramatic hole shrinkage may be experienced. Again utilizing the proper die clearance, the amount of hole shrinkage can be managed. Edge radius punch points for the softer aluminum grades should be avoided. A flat, sharp edged punch point without any shear angle performs best. The shear has a tendency to only deform the aluminum and cause more rollover in the hole in the softer aluminum grades.
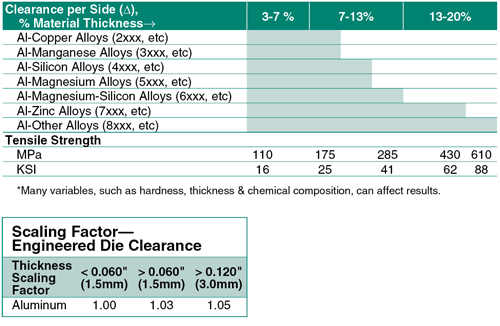
Punch to die clearance is a key factor when perforating aluminum. The recommended die clearance is directly related to the type of aluminum, its tensile strength, and the aluminum sheet thickness. The die clearances can run within a range of 3% to as high as 20% per side.
How to Select the Proper Clearance
Identify the tensile strength from the last rows in the chart.
Determine the recommended clearance from the shaded area for alloys.
Multiply the recommended clearance with the thickness scaling factor table.
Engineered (Jektole®) Die Clearance and Tensile Strength
