Improve productivity and tool life in stamping applications, starting with selection of optimum clearance in piercing and trimming applications.
Optimum Clearance – one number fits all?
Die designers, tool builders and Dayton Progress have advocated the use of optimum cutting clearance to improve tool life. With higher strength steels and other new sheet materials emerging in the market, the old clearance percentages seldom appear to provide reliable tool life. Why?
While working with the older sheet material grades, the tensile strength was lower. So even when the sheet gage or thickness increased, the loads experienced by the tools did not increase significantly. In turn, stampers generally applied a single clearance percentage across all thickness ranges. But with the newer grades, the tensile strength is much higher, and the load on the tools increases considerably with not just the tensile strength of the sheet, but also with the sheet thickness. For example, thicker sheets apply higher load on tools than thinner gage materials. Under these conditions, it is easy to see that one clearance percentage is no longer optimum.
New Clearance – one solution for each application!
With this finding in mind, stampers need to consider selecting clearances by material grade and thickness. Extensive tests on different sheet materials and thickness have generated an optimum clearance table similar to the one shown here. A typical clearance table shows the sheet tensile strength (X-axis) and gage thickness (Y-axis), and with increasing tensile strength and gage thickness should increase to improve tool life and productivity.
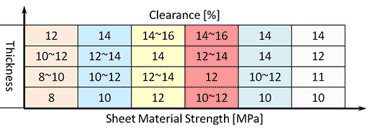
Typical clearance matrix by sheet tensile strength and gage thickness
Care should be taken when picking a clearance percentage from this table, and should favor recommended clearances for the particular sheet material, i.e. recommended clearance tables for Aluminum would differ from recommended clearance tables for DP Steel. Additionally, clearance selected will influence other process conditions such as tool load, resulting hole quality (roll-over), and tool life (failure mode), and will need to be considered.
We should now understand the need for selecting clearance based not only on the material being formed, but also upon the thickness of the material, and the material’s shear strength. But as always there are trade-offs while selecting a die clearance too near the minimum or maximum range. Let’s look at the influence clearance selection can have on piercing loads in further detail.
Optimum Clearance & Punching Loads
Traditional tooling practice has shown that increasing clearance will decrease piercing or shearing loads on the tools, thereby effectively increasing tool life. However, the effects of using the largest possible clearance on every application have never been studied fully until now. The graph below illustrates how the piercing load on a punch changes as we increase the clearance from 6% per side to 14% per side while piercing MART1400 steel (203KSI,1400MPa) of 0.040” [1mm] thickness. It is evident that when clearance is increased, the load does decrease – in this case by approximately 10%. One can imagine that the reduction in piercing load would decrease as the shear strength of the sheet material increases, i.e more reduction in load could be observed for low strength grades than high strength grades. Hence explaining the wide spread use of larger clearances to alleviate loads on tools by stampers.
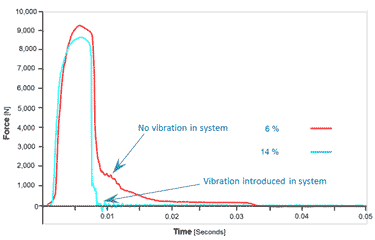
Piercing load recorded during piercing of 0.040” [1mm] thick MART 1400 grade sheet material (Courtesy: Börje, UT)
Perhaps the most important observation from this study is that vibration has been introduced and is larger than at smaller clearances. One can imagine that with increasing shear strengths of the sheet material, this effect will be more pronounced, i.e. higher strength steels will induce more vibration during piercing than low strength steels.
But why is this finding important? Well for one, when the tool assembly is not rigid, the hole geometry and location could differ between consecutive parts, resulting in quality issues. But more importantly, with larger clearance and greater vibration, tools are going to have a tendency to move during the piercing operation and become more prone to chipping rather than a gradual wear. Armed with this knowledge, stampers can work around this issue if larger clearances need to be used for an application, by using a headed retention system rather than a ball-lock retention system. While the use of the headed system will not completely eliminate or compensate for the vibration, it will greatly reduce the play in the assembly compared to a ball-lock system.
Clearance & Hole Quality
Another aspect to be considered while increasing clearance is the resulting hole quality. When the pierced hole is functioning as a clearance hole, the resultant burnish and break characteristics from the larger clearance is unimportant. However, when secondary operations are performed, such as tapping then stampers need to pay close attention to the effect of larger clearances on the resulting hole quality.
The micrographs below show the different hole quality for the same material pierced using two different clearances. It is clearly observable that the hole pierced with the larger clearance has larger roll-over and in turn may be unsuitable for secondary operations, even though the quality of the shear and break surfaces are clean. In turn, stampers need to select a clearance window that provides them with the best hole quality desirable and balanced with acceptable tool life.
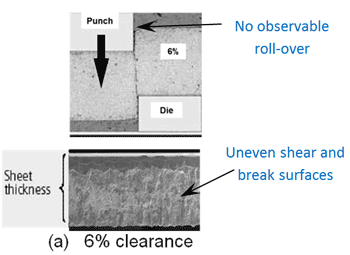
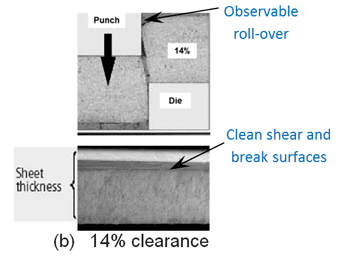
Hole quality conditions recorded during piercing of 0.040” [1mm] thick MART 1400 grade sheet material with different clearances (Courtesy: Börje, UT)
Perhaps the greatest influence clearance selection will have is on how tools perform and ultimately fail in production.
Tool Failure and Optimal Die Clearances
The HSLA steels require new considerations for tooling performance which are dramatically different than the old school one size fits all approach of lower carbon steels. Let’s revisit the general concept of die clearance and the measurement of hole quality.
The process of punching a hole involves impact and loading forces being exerted and focused upon the material confined between the punch point and die button. The material must fail during the perforating process in the anticipated manner or else the resultant hole is unacceptable. The success of creating the desired effect, the proper hole characteristics is heavily reliant upon the correct punch steel and the correct die clearance.
The “rule of thumb” clearance used for many years has been five percent per side. Clearance is defined as the percentage of material thickness per side, ie the distance between the punch point and the die button opening. The five percent was a good baseline but did not always consider the material characteristics and its thickness. These material traits can adversely affect the tool life and the hole size.
If the die clearance is too tight, the hole can be as much as .0005 in smaller than the punch. This condition creates excessive wear, extreme stripping pressure, and excessive burrs. When the die clearance is increased, the hole can be .0002-.0005 in larger than the punch. This leaves a slip fit condition and can decrease the abrasive punch wear by as much as two-thirds.
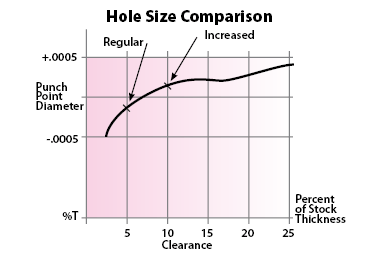
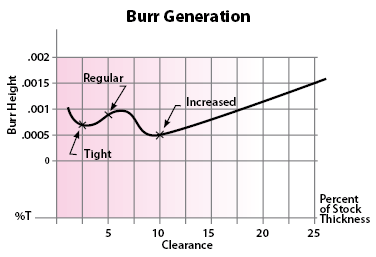
Hole quality is usually gauged by the burr generated during the piercing process. Measurement of the burr is the leading indicator of tool wear. As the burr increases, distinct wear can be clearly seen on the punch, which requires either punch sharpening or replacement. More die clearance does not mean more burr height. Actually as depicted in the chart, as the die clearance is increased and the size of the hole becomes larger than the punch, the burr height drops dramatically.
If the hole continues to decrease, without changing die clearance abrasive wear is occurring on the punch, from the pierced material eroding the surface of the punch. If the hole begins to increase, an adhesive wear condition is underway with the material seizing onto the punch.
